7 steps of Assembling Fishing Reel Handles
How to assemble fishing reel handles is a straightforward process when you follow the right steps. First, gather your tools, including a screwdriver, small wrench, and optional lubricant. Identify the parts: the handle arm, handle knob, screws, and any washers or spacers. Insert the handle arm into the designated slot on the reel, ensuring a snug fit, and secure it with the screws or bolts.
Next, attach the handle knob by aligning it with the arm and securing it with the provided screws. Rotate the handle to check for smooth operation, adjusting any loose screws as needed. Optional lubrication can enhance performance; apply a small amount and wipe off the excess. Regular maintenance, including periodic lubrication and tightening of screws, ensures the spinning reel handle remains in top condition. Proper assembly guarantees smooth operation and extends the lifespan of your reel, enhancing your fishing experience.
Follow these steps to master how to assemble fishing reel handles, ensuring your gear is always ready for your next adventure. Incorporating these techniques will keep your reel handle in optimal working condition, providing you with a reliable and enjoyable fishing experience every time.
Assembling fishing reel handles might seem challenging. But, with the right steps, it’s simple. This guide will help you assemble your fishing reel handle. Follow these steps to ensure your best spinning reel is ready for action.
- Step 1: Gather Your Tools
- Step 2: Identify the Parts
- Step 3: Attach the Handle Arm
- Step 4: Attach the Handle Knob
- Step 5: Check for Smooth Operation
- Step 6: Lubricate (Optional)
- Step 7: Final Checks
- Common Problems and Solutions
- Tips for Easy Assembly
- Benefits of Proper Assembly
- Maintenance Tips on How to Assemble Fishing Reel Handles
- Summary of How to Assemble Fishing Reel handles
Step 1: Gather Your Tools
You will need a few basic tools:
- A screwdriver (usually Phillips or flat-head)
- A small wrench
- Lubricant (optional)
- A clean cloth
Make sure you have the fishing reel handle and all its parts. Preparing everything makes the procedure go more smoothly.
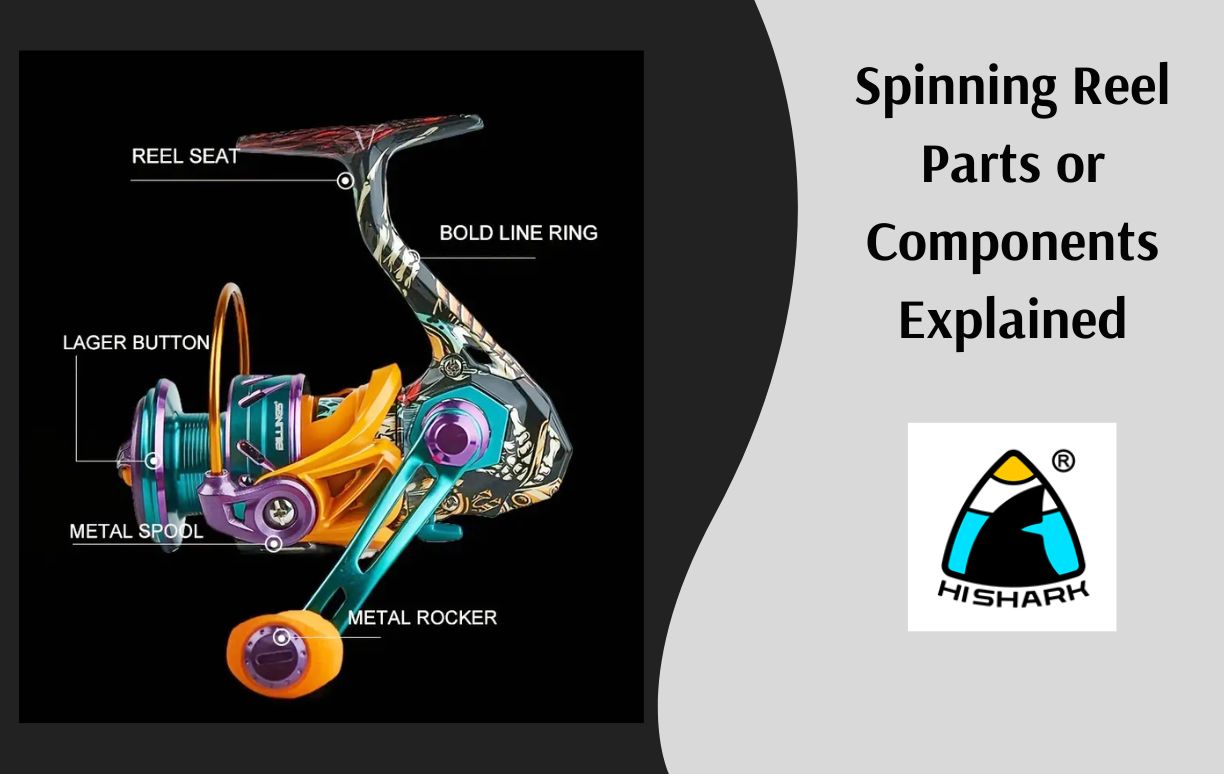
Step 2: Identify the Parts
Before you start, know the parts of your reel handle:
- Handle arm
- Handle knob
- Screws or bolts
- Washers or spacers (if included)
Understanding these parts helps you assemble the handle correctly.
Step 3: Attach the Handle Arm
Start with the handle arm. Follow these steps:
Locate the Slot: Find the slot on the reel for the handle arm. This is usually on the side.
Insert the Arm: Insert the handle arm into the slot. Make sure it fits snugly.
Secure the Arm: Use the screws or bolts to secure the arm. Tighten them with a screwdriver or wrench. Ensure that they are stiff but not overly tight.
Step 4: Attach the Handle Knob
Next, attach the handle knob. Here’s how:
Align the Knob: Align the handle knob with the end of the handle arm. Some knobs have a specific orientation.
Secure the Knob: Use the screws or bolts to attach the knob. Tighten them with a screwdriver.
Step 5: Check for Smooth Operation
After assembling, check if the handle works smoothly.
Rotate the Handle: Rotate the handle. It should move without resistance.
Adjust if Needed: If the handle is loose or doesn’t move smoothly, check the screws. Tighten or adjust as needed.
Step 6: Lubricate (Optional)
Lubricating the handle can improve its performance.
Apply Lubricant: Apply a small amount of lubricant to the handle arm and knob.
Wipe Excess: Use a clean cloth to wipe off excess lubricant. Too much can attract dirt.
Step 7: Final Checks
Make final checks to ensure everything is in place.
Inspect the Handle: Look for any loose parts. Tighten if necessary.
Test the Handle: Rotate it again to ensure smooth operation.
Common Problems and Solutions
Sometimes, you might face issues while assembling the handle. Here are common problems and solutions.
Problem 1: Handle Arm Doesn’t Fit
If the handle arm doesn’t fit, check these:
- Alignment: Make sure the arm is aligned with the slot.
- Correct Parts: Ensure you have the correct parts for your reel model.
Problem 2: Handle is Loose
If the handle is loose, try this:
- Tighten Screws: Tighten the screws or bolts.
- Check Washers: Ensure washers or spacers are correctly placed.
Problem 3: Handle Doesn’t Rotate Smoothly
If the handle doesn’t rotate smoothly:
- Check Screws: Ensure screws are not too tight.
- Lubricate: Apply fishing lubricant to reduce friction.
Tips for Easy Assembly
Here are some tips to make the assembly easier:
- Read the Manual: Always read the manual that comes with your reel.
- Use Proper Tools: Using the right tools makes the job easier.
- Take Your Time: Don’t rush. Careful assembly ensures better performance.
Benefits of Proper Assembly
Properly assembling your fishing reel handle has many benefits:
- Smooth Operation: A well-assembled handle operates smoothly.
- Longer Lifespan: Proper assembly extends the lifespan of your fishing reel.
- Better Fishing Experience: A smoothly operating reel enhances your fishing experience.
Maintenance Tips on How to Assemble Fishing Reel Handles
Regular maintenance keeps your reel handle in top condition. Here are some spinning reel tips:
- Regular Cleaning: Clean your reel handle regularly to remove dirt and debris.
- Lubricate Periodically: Periodic lubrication keeps the handle moving smoothly.
- Check Screws and Bolts: Regularly check screws and bolts to ensure they are tight.
Also you can see this article on how to maintain a spinning reel and you can compare them together.
Summary of How to Assemble Fishing Reel handles
Assembling fishing reel handles is easy if you follow the steps. Gather your tools, identify the spinning reel parts, and attach the handle arm and knob. Check for smooth operation and lubricate if necessary. Address common problems with simple solutions. Proper assembly and regular maintenance ensure your fishing reel handle operates smoothly and lasts longer. Enjoy a better fishing experience with a well-assembled reel handle.


